Sunday, September 29, 2013
Table & chairs made trendy!
I sold this table and chair set a couple of weeks ago (on Craigslist) to the most sweet young woman, a local university student who has her first apartment all to herself. After my hubs put the set into his truck, I followed her to her place and we carried it in and set it up by a big, old bay window. She was so excited and I was so happy to have the set go to her!
I purchased the table for twenty bucks from a yard sale this summer. It is solid wood & sturdy. I chose to sand and restain the top and paint the bottom. I wanted a color that would pop and be different - so I chose "Mariner" by Sherwin-Williams (after seeing it in an HGTV magazine). Once painted, I then wiped on a walnut stain, waited a minute or so, and wiped off w/cotton rag. I love how this set turned out - trendy color w/country sort of old fashioned appeal. Just what I was going for. :)
Befores...
{This pic was taken after I had sanded the top of the table. I needed to buy wooden filler buttons to cover base screws - found them at a local hardware store and glued them in.}
{These chairs were purchased for $3.99 each, from local Good Will store. Not exactly what I was looking for to match w/the table, but they were stury and cheap - and although incredibly filthy - I thought I could make them work w/table.}
Afters...
Linking to the Link Party Palooza at Tater Tots & Jello.
Tuesday, September 24, 2013
Piano Bench Redesign
This neglected piano bench {purchased for five bucks at a yard sale this summer} got a make-over using Annie Sloan emperor's red chalk paint and some chevron fabric, purchased at fabric.com. After cleaning the bench, I removed the hinged top to paint the base. Next, that old fabric had to go. The top was covered w/new foam and wrapped with fresh batting. Using a heavy duty staple gun, I attached the ironed new zig zag fabric to the inside top of the bench. Re-attached the hinges, and it's better than new!
I'm linking up (for the first time in almost a year!) to Kammy's Korner - Trash to Treasure. Thanks, Kammy, for the inspiration!
p.s. This bench is featured in the October issue of HGTV Magazine - You Showed Us! (page 18). So fun! :)
Saturday, January 26, 2013
entertainment center transformation!
Hello blog friends! :)
Everything has changed @blogger since my last post...hope I can navigate the new look and successfully share a project the hubs helped me to finish this morning.
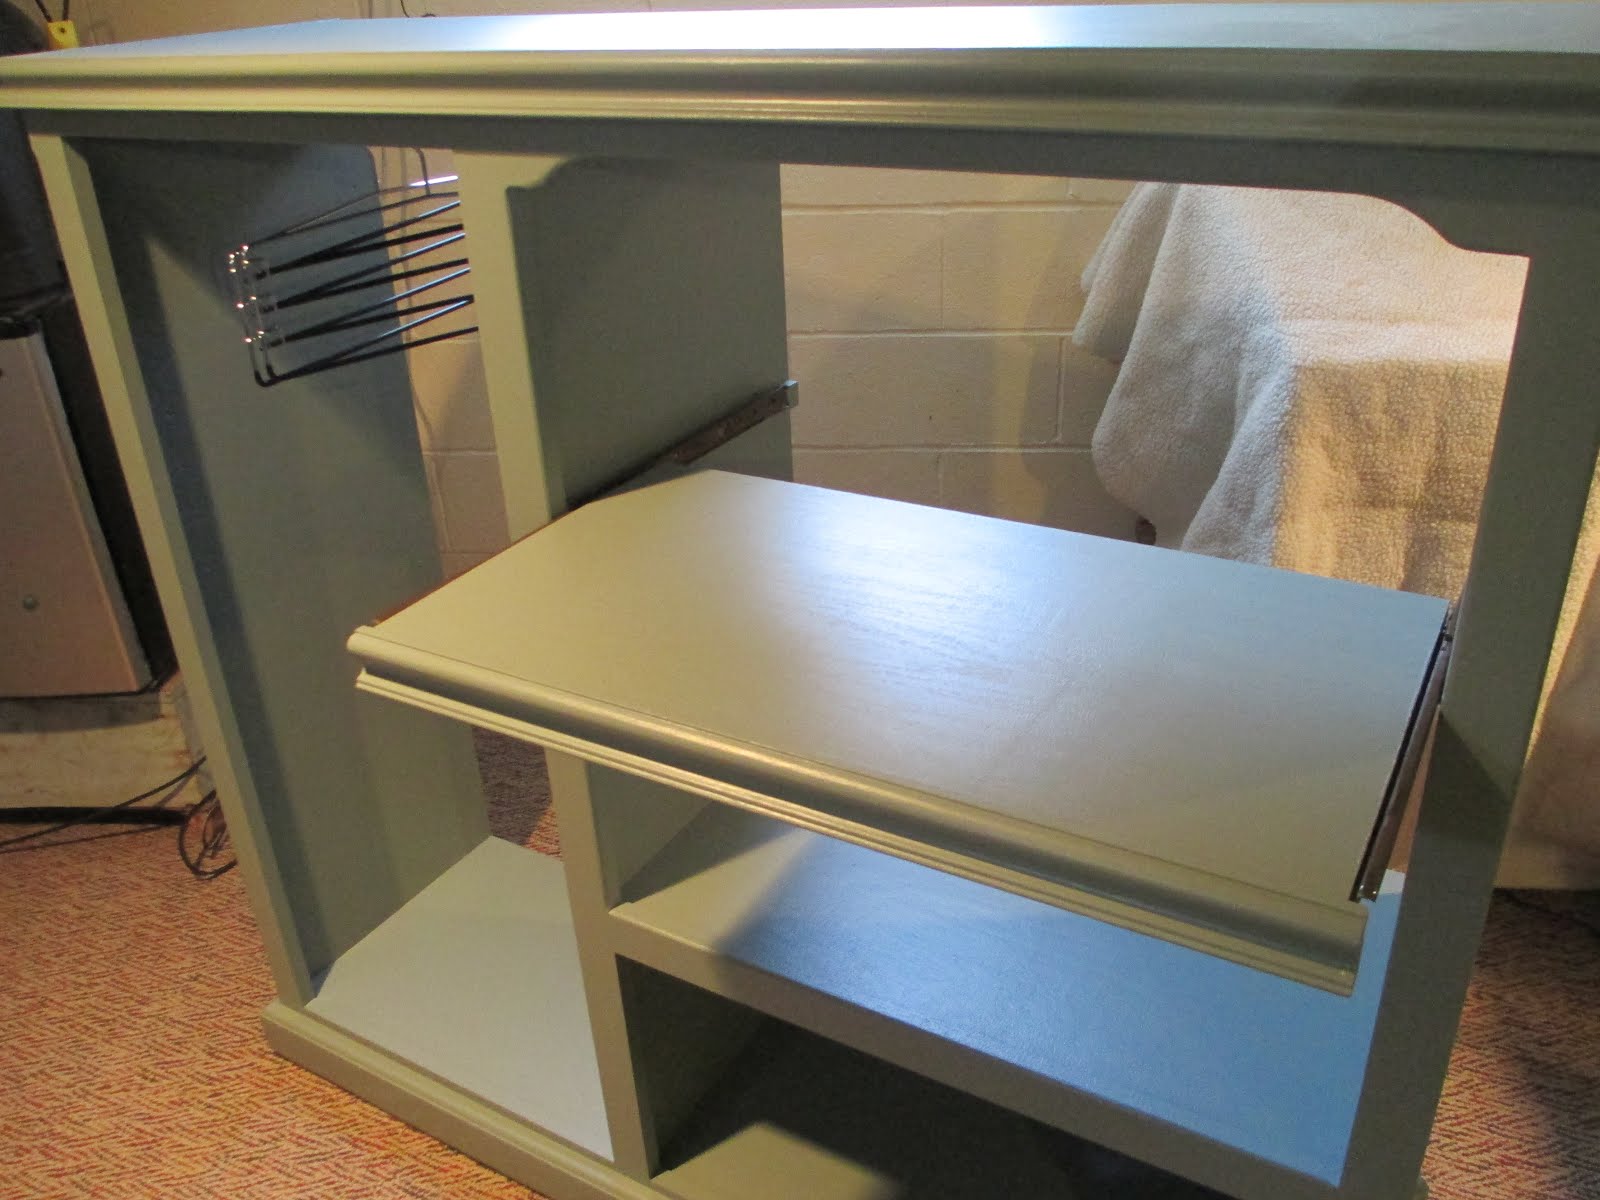
We bought this oak entertainment center about 20 years ago. As you can see, it held a big ass t.v. and lots of gaming systems (all neglected for a few years now). Housed in the basement, feeling very dusty & lonely...I thought this piece would appreciate a make-over.
Last week-end, our youngest son moved into a new apartment.
Both of our sons apartments have so little storage space - our oldest son doesn't even have a closet in his bedroom! Anyway, after seeing Matt's new place last Saturday, I thought "geez, I wish I could help this kid w/some storage options." Driving home, I thought about what pieces I had in the basement that could be repurposed.
Arriving home, I asked the hubs to come down to the basement w/me. "Can you take that t.v. out of there?" "I want to make this into a mobile closet for Matthew." One week later and we have a modern, very sturdy piece that will give our son some much needed clothes storage (since seriously, this guy has more clothing than 3 teenage girls, no joke.)
I first cleaned the entire piece w/soap and water. I know. It was dirty. I don't dust in the basement on the regular. Next, I sanded, filled the holes left by the hardware and shelves I removed, and cleaned up again. I primed w/Zinsser 1*2*3 primer and then painted w/2 coats of Sherwin-Williams "retreat", satin finish paint. IRL, it's a sharp gray/blue, perfect for a young man. Here it is primed.
Now I was ready for some help from the hubs.
He installed wood sockets and rod on the left side.
The right side originally had a slide out drawer above the television opening. He installed that back into the unit, but moved it down a foot.
Lastly, he put 4 swivel wheels on the bottom of the now closet to make it mobile.
Tomorrow the hubs and I will drive the closet up north to our son's new place. Can't wait for him to see it!
Linking up to Tatertots & Jello's week-end wrap up party.
Thanks for coming by!
Stay warm,
patti
Wednesday, March 28, 2012
{...some inexpensive wall art!}
For my first ever gallery wall, I wanted to mix in something fun with the photos. Scrounging around the house, I found a plain wood plaque in my craft room stash. I had purchased a package of stencils from Hobby Lobby a few months ago. Using black and white craft paint, I taped off the plaque and painted. Once dry, I applied the stenciled image with a stencil brush, using a pouncing motion. I considered applying some poly, or wax, or sanding the piece to distress it...but then decided I like it just the way it is.
This hallway is right next to my dining room where the dominant colors are black and white. Before pics would've been too embarassing. ;) I removed the blue plaid wallpaper that was on the top portion of the walls. The wood paneling along the bottom was oak. I primed and painted it to match the wall color in my dining room. Next, the hubs tore out the old blue carpet that had been there for 20 years. He installed a floating wood laminate floor - and can I just add here how much I love this floor? Holy geez...all you need to do is swiffer this thing and you are good to go. :)
For my other no-cost piece of wall art, I gorilla glued a pretty white plate (Pier One purchase, last year) to a black dinner plate. Fancy Pants letter stickers spell out "Family".
I'm really happy with the way this narrow hallway turned out.
Linking up @At Home w/K's Terrific Under Ten Tuesdays.
Thanks for stopping by! patti
Saturday, March 10, 2012
{...a twine covered lamp & shade}
Lit...
It's different and looks pretty in my craft room. {I love it.}
I've gotten a jump start on my spring cleaning this year! Last week, I cleared out my craft room to paint the walls, shelving and closet doors. The shelving is lime green and the walls are light turquoise. So springy! It is looking fresh and everything is organized. Love that! We're now waiting for our wood laminate flooring to arrive so that the hubs can remove the old gray carpet in there and replace it with clean flooring. :)
I'm sharing my lamp at Every Creative Endeavor, Tatertots and Jello's week-end wrap up party and at Domestically Speaking's Countdown to Spring. Thanks for stopping by!
hugs, patti

Friday, January 20, 2012
...framed {love}!
Fancy Pants "love story" line is so sweet!! This black and white words in heart shapes sheet is my favorite. I just {love} it!
This is the most quick, simple project.
Cut your pp to fit the frame.
Adhere some AC thickers.
Place paper into frame and display.
That's it!
For my project I used some Alene's glue on the back of each thicker because my package was old and they weren't sticking well.
I'm linking up to Paper Issues. There's a whole lotta love over there. :)
Also linking up to Every Creative Endeavor.
Thanks for stopping by! hugs, patti
Tuesday, January 17, 2012
{stamped Valentine table runner}
With right sides together, I stitched the long sides of the duck fabric (left-overs from altered bedroom drapes) together. After ironing the fabric well, I wrote down "Be My Valentine." to refer to, so that I wouldn't screw up my stamping. :) The MM stamps were one of the first things I purchased, all those years ago...when I started scrapbooking. Red paint is also by MM. Once my stamping was completely dry, I measured the edges, determined my equal distance hem lines, and top stitched the table runner together.
Linking up at Chic on a Shoestring...'cause seriously, this was zero cost. Yay!!!
Also linking up to Look What I Made!
Thanks for stopping by! Hope your day is stress-free! ;)
hugs, patti
Friday, January 13, 2012
...a painted bench for "free for all Friday"!!
Hey there! We're having our first snow day of the winter here in upstate NY - and honestly, it's just plain weird that we haven't had any snow 'til now!! We've probably got about 8" so far today.
This week, I painted a wooden bench that I've owned for well over twenty years. I bought it back when we lived in a little house that had knotty pine on 3/4's of the walls. It was a charming, cozy house, really. :)
It was in a corner in the basement, not being used. I'm glad the hubs didn't chop it up for kindling!
Fast foward to some brown Glidden paint, some Annie Sloan country gray chalk paint and some Annie Sloan clear wax. I didn't have a definite plan for this piece when I started...just sort of let it speak to me. :) I thought I'd stencil the top and front...but I didn't like it. Not at all.
This was my first time working with Annie Sloan paint and I loved it!! The top of this bench was uneven and pretty banged up. The AS helped to give me a smooth surface on which to stencil. As for the wax...well, maybe this wasn't the perfect piece to use it on. I like the finish well enough, but I'm not wowed by it. I think the wax would be much nicer used on an ornate furniture piece - and I've even got something in mind for a future project.
This little stenciled bench (stencil by Stencil ease, purchased at Hob Lob) is by no means a show piece, but it's at least usable now....and I can say I like it next to my chair in the livingroom. :) 
Linking up to Sassy Sites Free for All Friday. I really like Marni's site...there's always something new and different going on. :)
Thanks for stopping by and stay warm! hugs, patti
Wednesday, January 11, 2012
fUnkY JuNk junk drawer!!
Marni, at Sassy Sites is having a party in a junk drawer. Well, once she sees mine, she's going to change it up to "there's a riot in a junk drawer"...'cause people, this is total foolishness.
On Monday, my oldest son (Thomas) asked me "mom, do you have a rubber band?" Hmmm. I said "there's probably one in the junk drawer". He went to it and said, "but do you think I'll find one that actually still stretches and will work?" Now, that's just wrong. Right??
Thanks, Marnie, for this fun challenge! I have another drawer that is messy in my kitchen and am psyched to get to it. It feels sooo good to have this drawer under control.On Monday, my oldest son (Thomas) asked me "mom, do you have a rubber band?" Hmmm. I said "there's probably one in the junk drawer". He went to it and said, "but do you think I'll find one that actually still stretches and will work?" Now, that's just wrong. Right??
This has been our catch all junk drawer for 17 years. Honestly, I've cleaned it out during those years...but it never seems to last. And another honestly...it's {mostly} because of me that it doesn't last. Time for a change!! :) :)
A quick stop at The Dollar Store after work today, and I was headed home with some white plastic pieces that were going to help hold my junk in order. A DYMO label maker came in handy for identifying items.
Check out Sassy Sites for more fun!!
hugs, patti
Subscribe to:
Posts (Atom)