Saturday, December 31, 2011

...a jewelry holder!

Hey everyone! Happy New Year's Eve!!
Citrus Tree Studio is having a New Year's crop...and they have got some kick-a$$ challenges going on!! Lay-outs, cards, altered items - it's all covered!
Melonie has a challenge to get organized for 2012.
For Mel's challenge, I made a trip to Hobby Lobby where I purchased three knobs (50% off). I had a plan to create a jewelry holder for our niece, Elly, who will turn 11 yo this next week.

After the board was lightly sanded, I painted it w/MM coral paint and then dabbed it with TH vintage photo ink. Using one piece of Lily bean pp, I cut, inked and mod podged each piece to the pine wood board (just under 8x10"). Next, using a sponge brush (sponge brushes give you a nicer finish when the mod podge dries), I applied a top coat of matte mod podge.

Once the piece was dry, I screwed in each sparkly knob. {Note - the knob screws were really long and needed to be cut so that they didn't poke through the back of the plaque. The hubs did this part for me.}

Don't hesitate to come by Citrus Tree to participate in the fun. I was away for months and months...no matter! The girls there are sweet and welcome everyone. :)
Thanks for coming by and I hope you all have a wonderful night tonight...welcoming in 2012!!!
I'm also linking up to Creations by Kara, Look what I made!
hugs, patti

Thursday, December 29, 2011

bathroom cupboard make-over!

Seriously, this cupboard was so grungy and awful that I didn't even think to take a before photo. Now I really wish I had because I love the way this fresh cupboard looks. :) I bought this pine cupboard over 20 years ago, at a Country Folk Art Show. Here are the doors and center divider that I removed. I scrubbed, sanded and then spray painted it a glossy dark chocolate brown. Using Elmer's spray glue, I then applied some fabric to the back of the shelf spaces. This cupboard was meant to primarily hold my face cloths and hand towels.
This is our second bathroom. The one that guests don't use...some people don't even know it exists. ;) haha! We all shower in here every day though because we like this shower best. :)
Some fresh ceiling paint (and ceiling repair done by yours truly - I am getting so good at mudding!), bold green (I know, it's not for everybody!) wall paint, cute new curtains (2 rod pocket panels, material purchased at jo-ann's), new light & faucet and it feels like an updated bathroom.I'm linking up to The House of Grace Blog, Twice Owned Tuesday challenge and to Look What I Made! I really appreciate seeing old pieces get new life!
Thanks for stopping by! hugs, patti

Saturday, December 17, 2011

Homemade wall art in our updated bathroom!

We finished the guest bathroom today! The last of the grout! YAY!! :)
The hubs and I re-did a bathroom by removing the original pink mosaic floor tile, toilet and vanity. I love our new white tile floor w/bright white grout....even though I need to swiffer it twenty-four seven. ;) ;) The toilet is awesome! I know that may sound weird to be so excited over a new toilet, but this baby is sleek in design which makes for easy cleaning which makes me so happy!
The day the hubs removed (okay, more like tore out) the old vanity, I stopped him long enough to remove the doors. Using one, I painted it a bright white semi-gloss (Valspar trim paint is the best), and then traced a pattern around the inside of the door. I then mod podged down a piece of LYB scrapbook paper. Such an easy project!

Just for fun...here are some bathroom pics too.

before...

after...

I'm linking up my wall art project to Twice Owned Tuesdays, at the creating a house of Grace blog. This is the 75th Twice Owned Tuesdays challenge. Very cool!

Thanks for stopping by today!
My hubs is feeling better...well enough that we're planning to go cut a Christmas tree tomorrow. :)

Hope you're feeling the magic of the season!
hugs, patti

Wednesday, December 14, 2011

anything goes at the Paper Variety!

I love "anything goes" challenges! They are so easy to play. :) :)

I recently punched some snowflakes, added them to red cs, and then applied this "merry and bright" rub-on. When placed inside a bright white frame, it looks like this. Simple & sweet.


I'm linking up to the Paper Variety.

Hope you are enjoying this holiday season!
I'm almost done with my shopping. I baked two batches of cookies yesterday. Still don't have a big tree up...the hub's had a bit of surgery (last week) and putting up the tree requires him to lug out the tree stand, saw, drag the tree into the house, etc. It's work. I'll be content with my little artificial tree, just as long as I have my boys home and a healthy hubby. :)

Thanks for coming by today!!
merry, merry, patti

Saturday, December 3, 2011

Crate & Barrel Knock-Off Pillow!


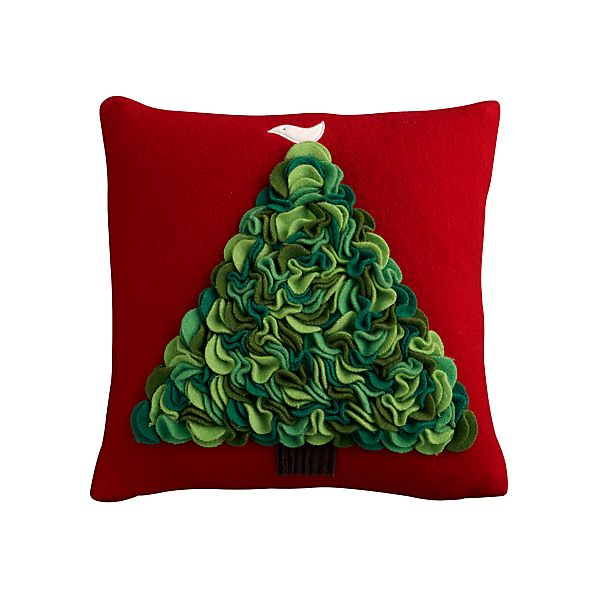
This morning, I saw this "Merrie" pillow at the Crate & Barrel website and ran to my fabric stash. I knew I had this green fleece, bought years ago on clearance, and thought it would make a cute tree pillow. C&B's pillow:
Using cream colored cotton duck cloth cut from my recently altered bedroom drapes as background fabric, I began hand stitching the hand-cut circles of green fleece into the shape of a tree. I also added some dark green felt circles for a little contrast. The bird is machine stitched red felt w/a tiny DMC black french knot for an eye. The tree trunk is a simple rectangle of brown felt, also machine stitched.
Total cost for this pillow --- zero dollars. HA!! That's one good thing about getting older, as you age...so does your stash for crafting. :) :)
I'm linking my pillow up at the House of Grace blog, for the Twice Used Tuesday Party!

Thanks for stopping by! Hope you're having a great week-end. The sun is shining here today!!
hugs, patti

Thursday, December 1, 2011

A holiday buffet vignette~

I had so much fun with my very first vignette. I've been under the impression that "vignettes" should be and are fancy. Vignettes are for decorator's with BIG budgets and serious skills. Vignettes belong in grand homes. Well, guess what? That's nonsense! You can have a vignette in a small 10'x12' dining room, on a repurposed buffet, and it doesn't need to cost a fortune.
Mine is proof. :)
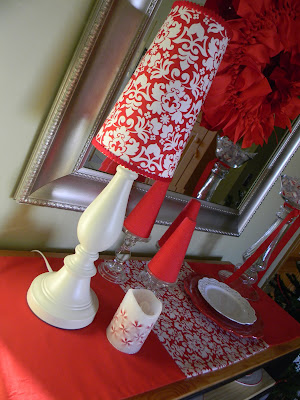
I picked up a yard of this red & white fabric at Hobby Lobby. I sewed the table runner and then covered the lamp shade. Some offray felt trim was also added to the shade. Here is a view of the open shelf that holds some red & white dishes that I got on clearance at Kohl's last year - birthday present to myself. :)
This tall glass dish can be used as a candy dish or candle holder and if flipped, it is a vase. It was on clearance at Pier One. Yarn trees - because I love yarn trees.
And, finally a peppermint candle, also from Pier One, completes my holiday buffet.
I'm linking up to A Thoughtful Place, and passing along the merry. :)
Happy December, all!!!
hugs, patti

Yarn trees!

You've seen them...styrofoam trees covered with jute, burlap, fabric, yarn. I adore them!!
All you need for this trio of trees are 3 stryofoam tree shapes, yarn and some glue. I used red yarn I had on hand and Tacky glue by Aleene's. It dries quickly and comes out of the bottle in a thin line that is easy to control. Start at the base of the tree and apply a tiny bit of glue. Add your starting end of yarn and let dry for a minute, just so your starting point is sturdy. Now, apply a row of glue - sparingly - you don't need a lot and you don't want it seeping through. Wind the yarn around, applying glue, then yarn...until you reach the top. These each took me over an hour to make. Find a comfy spot - I made them while watching a hockey game.
Mine are placed on top of glass candlesticks from Walmart. I love the texture they add to my red and white holiday buffet.
Thanks for stopping by today! Happy December!
hugs, patti