Wednesday, March 28, 2012

{...some inexpensive wall art!}


For my first ever gallery wall, I wanted to mix in something fun with the photos. Scrounging around the house, I found a plain wood plaque in my craft room stash. I had purchased a package of stencils from Hobby Lobby a few months ago. Using black and white craft paint, I taped off the plaque and painted. Once dry, I applied the stenciled image with a stencil brush, using a pouncing motion. I considered applying some poly, or wax, or sanding the piece to distress it...but then decided I like it just the way it is.

This hallway is right next to my dining room where the dominant colors are black and white. Before pics would've been too embarassing. ;) I removed the blue plaid wallpaper that was on the top portion of the walls. The wood paneling along the bottom was oak. I primed and painted it to match the wall color in my dining room. Next, the hubs tore out the old blue carpet that had been there for 20 years. He installed a floating wood laminate floor - and can I just add here how much I love this floor? Holy geez...all you need to do is swiffer this thing and you are good to go. :)

For my other no-cost piece of wall art, I gorilla glued a pretty white plate (Pier One purchase, last year) to a black dinner plate. Fancy Pants letter stickers spell out "Family".


I'm really happy with the way this narrow hallway turned out.

Linking up @At Home w/K's Terrific Under Ten Tuesdays.

Thanks for stopping by! patti

Saturday, March 10, 2012

{...a twine covered lamp & shade}

Twine is one of my favorite scrapbooking embellishments. I love the old fashioned charm that it adds to any project. Brown/white twine from The Twinery was used to cover this five dollar lamp I picked up last fall at Walmart. Five bucks for a lamp? Okay then. :) I use it in my craft room for a bit of extra task lighting.
To cover the lamp base, I began with a dab of glue placed at the top, while winding the twine around the entire lamp -- all the way down to the bottom. I randomly placed small dabs of glue as I went along - not entirely covering the lamp with glue. The process took about 3 hours.
A plain shade just didn't work. I knew I wanted to paint the shade. Using brown, sky blue and white Folk Art paint, I taped off the rows and got to the painting. When dry, my scrapbooking friends, Kelly & Marti suggested I add twine to the shade. Hesitant at first...I decided I liked it once it was done. :)

Lit...

It's different and looks pretty in my craft room. {I love it.}


I've gotten a jump start on my spring cleaning this year! Last week, I cleared out my craft room to paint the walls, shelving and closet doors. The shelving is lime green and the walls are light turquoise. So springy! It is looking fresh and everything is organized. Love that! We're now waiting for our wood laminate flooring to arrive so that the hubs can remove the old gray carpet in there and replace it with clean flooring. :)
I'm sharing my lamp at Every Creative Endeavor, Tatertots and Jello's week-end wrap up party and at Domestically Speaking's Countdown to Spring. Thanks for stopping by!

hugs, patti


Friday, January 20, 2012

...framed {love}!


Fancy Pants "love story" line is so sweet!! This black and white words in heart shapes sheet is my favorite. I just {love} it!

This is the most quick, simple project.
Cut your pp to fit the frame.
Adhere some AC thickers.
Place paper into frame and display.

That's it!
For my project I used some Alene's glue on the back of each thicker because my package was old and they weren't sticking well.

I'm linking up to Paper Issues. There's a whole lotta love over there. :)
Also linking up to Every Creative Endeavor.

Thanks for stopping by! hugs, patti

Tuesday, January 17, 2012

{stamped Valentine table runner}

Yesterday was such a stressful day. I'm so glad that I can come home to the solitude of my craft room. This table runner was such an easy project!! I love the simplicity of it and I love that it didn't cost me a dime! Yay!!! :)

With right sides together, I stitched the long sides of the duck fabric (left-overs from altered bedroom drapes) together. After ironing the fabric well, I wrote down "Be My Valentine." to refer to, so that I wouldn't screw up my stamping. :) The MM stamps were one of the first things I purchased, all those years ago...when I started scrapbooking. Red paint is also by MM. Once my stamping was completely dry, I measured the edges, determined my equal distance hem lines, and top stitched the table runner together.
To add some color to the hurricane dish w/candle, I poured red sprinkles {left-over from Christmas} around the perimeter of the candle. Sweet, easy & cheap. :) :) :)
Linking up at Chic on a Shoestring...'cause seriously, this was zero cost. Yay!!!


Also linking up to Look What I Made!
Thanks for stopping by! Hope your day is stress-free! ;)
hugs, patti

Friday, January 13, 2012

...a painted bench for "free for all Friday"!!

Hey there! We're having our first snow day of the winter here in upstate NY - and honestly, it's just plain weird that we haven't had any snow 'til now!! We've probably got about 8" so far today.
This week, I painted a wooden bench that I've owned for well over twenty years. I bought it back when we lived in a little house that had knotty pine on 3/4's of the walls. It was a charming, cozy house, really. :) It was in a corner in the basement, not being used. I'm glad the hubs didn't chop it up for kindling!
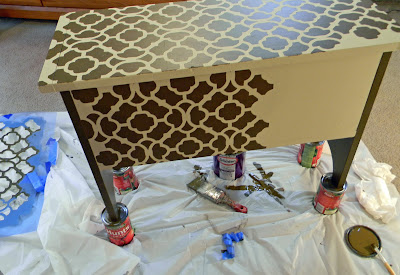
Fast foward to some brown Glidden paint, some Annie Sloan country gray chalk paint and some Annie Sloan clear wax. I didn't have a definite plan for this piece when I started...just sort of let it speak to me. :) I thought I'd stencil the top and front...but I didn't like it. Not at all.This was my first time working with Annie Sloan paint and I loved it!! The top of this bench was uneven and pretty banged up. The AS helped to give me a smooth surface on which to stencil. As for the wax...well, maybe this wasn't the perfect piece to use it on. I like the finish well enough, but I'm not wowed by it. I think the wax would be much nicer used on an ornate furniture piece - and I've even got something in mind for a future project.
This little stenciled bench (stencil by Stencil ease, purchased at Hob Lob) is by no means a show piece, but it's at least usable now....and I can say I like it next to my chair in the livingroom. :)
Linking up to Sassy Sites Free for All Friday. I really like Marni's site...there's always something new and different going on. :)
Thanks for stopping by and stay warm! hugs, patti

Wednesday, January 11, 2012

fUnkY JuNk junk drawer!!

Marni, at Sassy Sites is having a party in a junk drawer. Well, once she sees mine, she's going to change it up to "there's a riot in a junk drawer"...'cause people, this is total foolishness.

On Monday, my oldest son (Thomas) asked me "mom, do you have a rubber band?" Hmmm. I said "there's probably one in the junk drawer". He went to it and said, "but do you think I'll find one that actually still stretches and will work?" Now, that's just wrong. Right??
This has been our catch all junk drawer for 17 years. Honestly, I've cleaned it out during those years...but it never seems to last. And another honestly...it's {mostly} because of me that it doesn't last. Time for a change!! :) :)
A quick stop at The Dollar Store after work today, and I was headed home with some white plastic pieces that were going to help hold my junk in order. A DYMO label maker came in handy for identifying items.
-closer look at all this awesome organization-
Thanks, Marnie, for this fun challenge! I have another drawer that is messy in my kitchen and am psyched to get to it. It feels sooo good to have this drawer under control.

Check out Sassy Sites for more fun!!
hugs, patti

Friday, January 6, 2012

look what $4.57 got me!


A beautiful new-to-me sofa table! Some Minwax dark walnut stain purchased from Lowe's helped me with the transformation. I sanded, cleaned, stained, and applied two coats of satin poly.

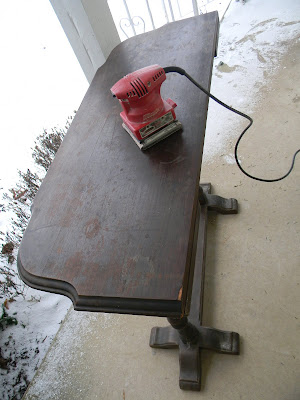
Here's a before shot I took from the front porch. A stained, chipped and generally in pretty poor shape table - just beggin' for some attention. {Yesterday was a gloomy day of about 20 degrees. I crack myself up that I was out there with the palm sander. Can't let a little bit of winter get in the way of progress!}
This table's been in my basement for a few years. It came from my MIL's attic when one of the boys needed to use it in their apartment kitchen. Fast forward to this week. I rearranged our living room furniture and was sick and completely tired of the blank wall behind the sofa. {yes, I painted this past Fall and never got it together w/wall art.}
I love that this table is the same height as the back of my couch. With it being 15" deep, it fits nicely behind the couch. I wish it were a little bit wider, but hey...it'll do. :)
I think this is where the table will stay for a bit. After rearranging the furniture for a second time, the hubs and I are happy with the new lay-out.
I'm linking this post up to the Twice Owned Tuesday challenge, Kara's Look What I Made!, and Sassy Site's Trash to Treasure Tuesday. Also linking for the first time to My Repurposed Life's Catch as Catch Can. :)
Thanks for stopping by! hugs, patti